Did you know you can use the badge layout tool in PhotoLaser Plus to create serial tags with variable data? It's a quick and easy way to create a serialized tag system that can be engraved and cut with the laser.
In this article we'll be looking at how to do a quick serial tag setup with a serial number.
We'll start by designing a single tag,then use that template to setup as many tags as needed. In this case, we'll be creating twenty 2" x 1" badges.
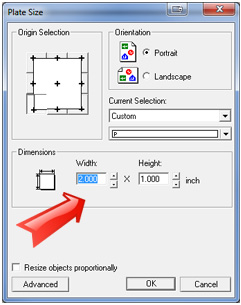
1) Open PhotoLaserPlus and set the plate size to 2" x 1" - the size of one serial tag.
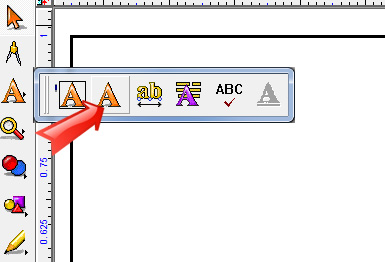
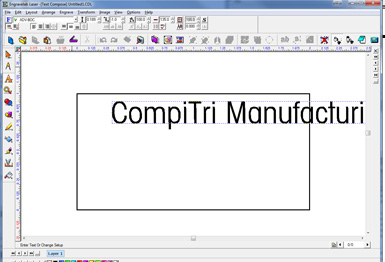
2) Now you're ready to setup a single plate as a template. Click on the Text button in the menu, then select the Text Compose tool (the second choice in the fly-out window).
3) Click approximately where you want the text to appear on the page, then type your text.
4) To resize your text, choose from the following:
- drag from the corners to change the size
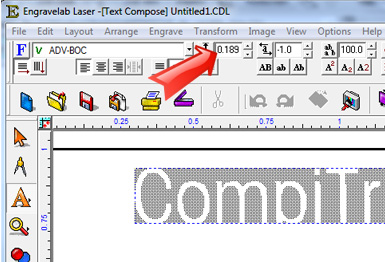
- or to set an exact measurement, select the text to open the text editing menu at the top of the page, then change the text height in inches.
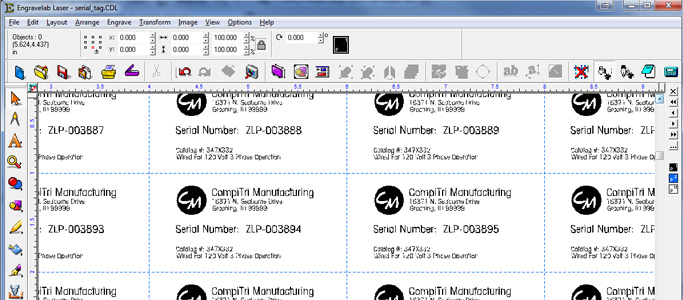
5) Complete your template serial tag. In this case, our variable data will be the serial number. ZLP will remain constant, while the six numbers will change. Select everything on the badge. If you don't do this, the unselected items will not be repeated on the badge. When everything is selected, click the Badge Tool in the tool bar at the top of the page (or select Layout/Badges.)

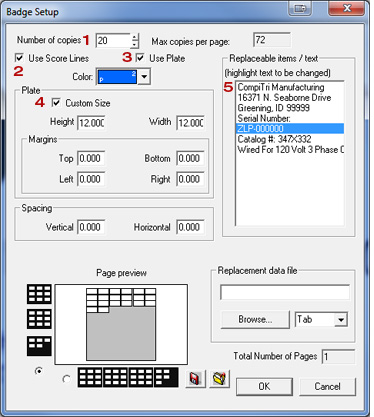
6) Set the badge setup parameters as shown below.
1. Number of copies: set to the number of tags you want to create, in our case 20.
2. Score Lines: This is an optional setting you can use to vector cut the badges if you are using a material like wood or plastic.
3. Use Plate: It's important that this setting is checked so the graphic corresponds with the actual plate size you are using.
4. Custom Size: The custom plate size corresponds to the size of the material you're using to engrave the badges - a 12" x 12" piece of plastic in this case.
5. Replaceable items/text: This box will show you any text that can be a variable to be changed in your file. In this case, it refers to "ZLP-000000" that we typed earlier. It is very important that this field is highlighted before moving to the next step.
Press OK to continue.
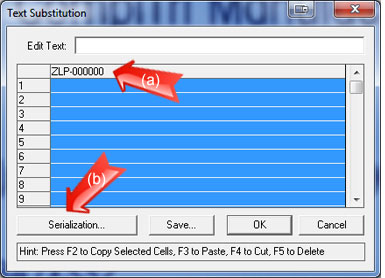
7) The Text Substitution box will appear. Click on the variable data text at the top of the list "ZLP-000000" (arrow a) to activate the Serialization button.
Click the Serialization button (b) to continue.
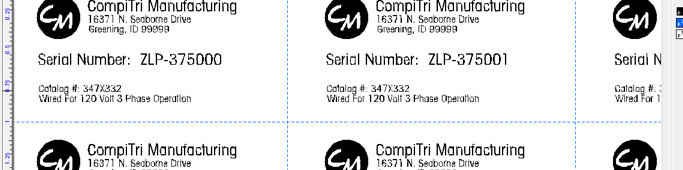
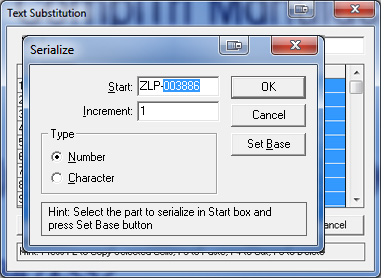
8) In the Serialization Window that opens, type a starting serial number. In this case, we're on part number 3886.
Type the entire serial number, including the non-variable characters, "ZLP-003886".
Highlight the variable portion of the number "003886". Click the Set Base button to let the software know that you want to change this section on each tag.
Set your Increment, in this case we want the number to change by one.
Finally, press OK to continue.
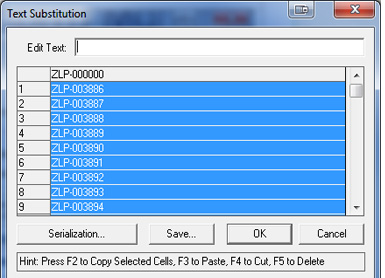
9) The Text Substitution window will give you a preview of the serialization of the data you will be updating on the tags.
Press OK to continue.
10) Your tags are ready to go! Just print them to the laser.