|
|
How-to Create Wood Veneer Inlays
By Terry Beauchamp
Whether you are just starting out or an expert woodworker, creating decorative inlays for your wood projects with your laser will enhance the design and profitability of many of your products.
Epilog Terry Beauchamp put together this very helpful article to educate people on the techniques she uses to enhance the beauty of her wood products with wood inlays.
Download the PDF version of this tutorial - Quilter's Box Inlay PDF.
|
|
|
|
|
|
|
|
|
It starts with an idea and a little computer know how.
Once you find your graphic you'll need to convert it into a useable form and clean it up so you will be able to
break it apart or ungroup it later for the inlay.
|
|
|
|
|
|
Here are the results of tracing and inverting the shapes in the above pattern.
|
|
|
|
|
|
Open the box pattern in CorelDRAW (to download this pattern go to: epiloglaser.com/sc_musicbox.htm
Remove the graphics that are on the music box.
|
|
|
|
|
|
Import the graphics you want to use and scale the size to fit the box. At this point, your layout is done and you are ready to run ONLY the raster portion of this job.
Download the quilter's box pattern: epiloglaser.com/sc-inlay.htm
|
|
|
|
|
|
You should engrave the graphics two or three times to create enough depth needed for the veneer to fit the inlay space.
Use settings that are right for your machine and wattage.
|
|
|
|
|
|
Veneers are very thin sheets of wood and come in many sizes and colors. Some come with paper backs or adhesive backs (like peel and stick); however, Terry simply used plain wood veneer for this project.
|
|
|
|
|
|
Drag all the boxes off to the side of your work surface. This is where you ungroup your pattern, so you can select one piece at a time. As you can see there are now four squares on the work surface, because they will be cut from the same veneer.
|
|
|
|
|
|
Prior to gluing your first pieces, you may want to insert them first to ensure you're happy with the placement and fit. If your fit is really close, but not quite close enough you can do one of two things: 1) rerun the piece over again or 2) after all the pieces are glued in place and sanded, use wood filler.
|
|
|
|
|
|
Set your veneer in your laser with the stripes running from the top to the bottom. In CorelDRAW when you add the triangles, turn the shapes so the bottom of the triangle is at the top and your point is pointing to the bottom. Now on to gluing...
|
|
|
|
|
|
Use a fast-drying cyanoacrylate glue. You have to hold the piece in place for about 30 seconds before it sets. It's also gap filling, which is helpful. Careful not to glue your fingers together or to your cut pieces!
|
|
|
|
|
|
Sand the veneers flush with the project board. At this time, check the veneers for any chip outs as well as any glue failures. If you want, now is the time to use wood filler, let it dry and sand.
|
|
|
|
|
|
Terry prefers to do the finish before she cuts out the box, because it makes for easier clean up. You can already see the colors starting to pop! Also, take the time to finish the back side so the inside of the box is also finished.
|
|
|
|
|
|
To make this very easy – open the Master Box Layout and use this for your vector cutting. If you want to use the file with your patterned box layout, remember to select only the outer lines you want to cut.
|
|
|
|
|
|
Now it is time to cut out the box. For this step you'll need to check for the correct settings for your laser and wattage. After a little touch up, we are now ready to glue our box together.
|
|
|
|
|
|
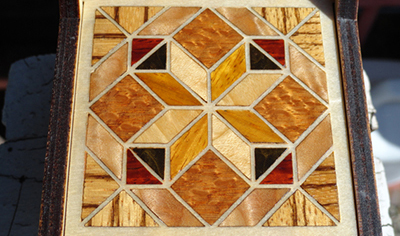
The last step is to glue the box together
To the right is the finished product!
We'd like to thank Terry Beauchamp for sharing this wonderful creation with you, our customers!
To download the tutorial PDF visit: epiloglaser.com/sc-inlay.htm
To learn more from users like Terry, visit our Facebook fans link on our home page.
|
|
|
|
|
|
|