Replacing the Epilog Legend 36EXT Lens Assembly
Although the standard 2" focal lens that comes with the EXT will work well for most projects, to achieve the optimum laser beam on special types of projects, we offer two optional focus lenses. The optional lenses on the Legend 36EXT are designed not only to add additional functionality to your laser, but also to be quick and easy to replace.This article will look at the advantages of usingeach of the optional lens assemblies and changing them.
Do not be intimidated by changing the lens of the Legend 36EXT - it is a quick and easy process! All that is required is a phillips screwdriver, and the lens assembly you would like to switch to.
When to use the 1.5" lens assembly
- Optional lens for “High Resolution” engraving.
- Recommended for raster engraving above 600 DPI resolutions.
- Recommended for very small font or exceptionally fine detail engraving.
- Produces spot size of less than 0.003 inches in diameter.
- Good cutting lens for thin (<=1/16 inch) material.
When to use the 4" lens assembly
- Produces focused beam over longer vertical distance.
- Specialty lens typically used for engraving within recessed area (bowl or plate).
- Used for cutting thick materials.
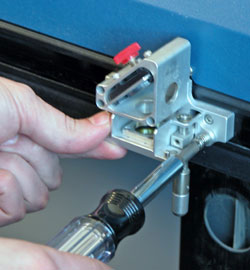
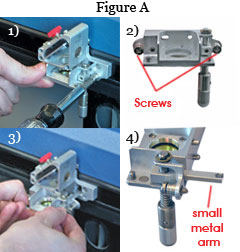
To replace your lens assembly, hold the lens from the front corner (see Figure A ONE) and unscrew the screws (shown in Figure A TWO) using your phillips screw driver.
Pull the lens out once the screws are loose. The lens will look like Figure A TWO.
When placing the new lens into the machine or putting your old lens back in, first put the small metal arm (shown in Figure A FOUR) into its provided area in the machine (Figure A THREE), which you will see when you take out your 2" lens.
Next, align the screws to the holes. Hold the bottom of the lens securely while bolting the screws back in. And that's it - the lens assembly has been designed to make it as easy as possible to change out your lens for a single project and to replace it with the standard 2" lens when you're done!