In most cases the Bravo Duplicators or LX Series Printers need no regular maintenance. However, there are a few things that can be done when they show signs of ink build up or label debris build up.
1. Encoder Strip. Periodically check the encoder belt/strip for ink build up. Clean the front and back with a soft cloth and alcohol. Ink over spray can build up on this strip and cause horizontal movement problems including offset printing and picking problems. The encoder belt is the clear plastic strip about 1/4" in width inside the unit running parallel to the metal bar that the arm (if applicable) and cartridges glide on. (Not the white ribbon cable connected to the print carriage.) It looks tinted because there are many little vertical lines on it that the head carriage reads like a road map to find its way left and right.
Encoder Strip Cleaning Procedure:
Obtain a paper towel or lint-free cloth, wet with rubbing alcohol. Move the robotic arm (if applicable) and head carriage (or ink cartridges) all the way to the left. Take the wet portion of the paper towel and pinch it around the encoder strip so both sides are touching the paper towel. In one movement, go all the way from the right all the way to the left. If you get a visible amount of dust or ink off the belt, you should probably do it two or even three times to make sure you get it completely clean. After that, move the carriage and robotic arm (if applicable) all the way to the right, and do the same thing, going from the left, all the way to the right. Again, do it multiple times if necessary.
2. Grease moving parts. Periodically check the metal guide shaft/bar for ink build up. The metal guide bar is what the arm (if applicable) and cartridge glide back and forth on. Clean it with rubbing alcohol. Re-grease with light or white lithium grease (Use Nyogel 744 if available). Also put a small amout of white lithium grease on the metal frame. The cartridge carriage hooks over the top or underneath the metal frame. The frame guides the top of the carriage whereas the guide shaft guides the bottom.
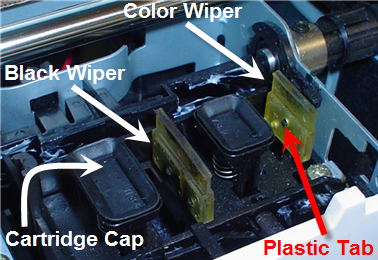
3. Check the Maintenance (Capping) Station for ink build up / Replace Wipers. (Does not apply to LX1000 or LX2000) The capping station is where the cartridges dock when not printing. The rubber cap just naturally builds up ink over time. There can also be ink residue on the wiper. The fix is easy. Just wipe off the capping station components occasionally with a damp cloth. The components that need cleaning include the cap itself as well as the two clear plastic wipers just to the right of the cap. See the images below:
The color wiper may actually need replacement after several thousand prints if you notice light printing on the first few passes or leading edge of the label or disc. Request a new wiper from tech support. To replace it simply use a screw driver to bend the wiper so the hole in the wiper clears the plastic tab on the maintenance station. Pull the wiper from the maintenance station. Replace it by pressing the wiper down until the plastic tab fits into the hole on the wiper.


4. (LX Series Printers Only) Check the grit roller (feed roller) for label debris build up. Clean with a Cotton Swab (Q-Tip) and alcohol.
5. (LX Series Printers Only) Using canned air blow out the infeed area where the label stock is fed into the printer. First remove the label stock. Label debris and dust can build up here and prevent the printer from sensing gaps between labels or black marks.
6. (LX2000 and LX1000 Only) There are some additional cleaning/maintenance procedures that apply only to the LX1000 and LX2000. LX2000-LX1000 Maintenance Instructions.