What is the best way to copy/create a DVD?
1. Create DVD folders from your authoring program directly to your Hard Drive.
2. Using the recommended methods explained below, burn those folders directly to your DVD using Primo DVD, Discribe(Mac) or PTPublisher.
This will give you the lowest possible reject rate and the highest possible player compatibility rate. By using this method, the fewest amount of variables are introduced into the recording process. By reducing variables, you increase the compatibility rates.
Download this flash movie for a complete step by step guide for creating a DVD-Video from AVI video files to finished DVD.
Download Tutorial - 11.5 MB
Click on the links below for instructions. Depending on which application you are using, the job name varies slightly but the result is the same.

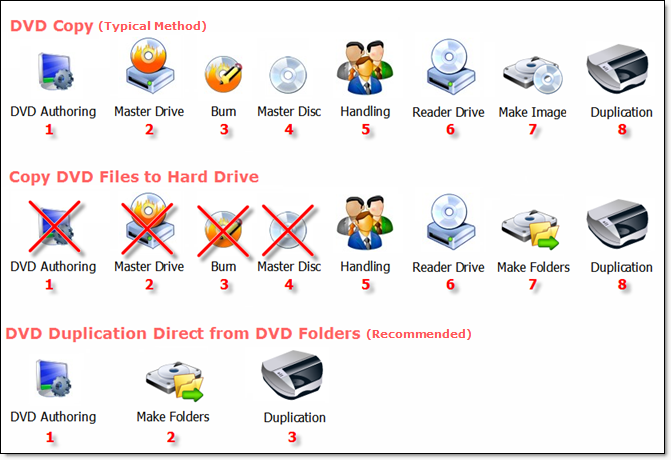
Figure 1 - Variables per Job Type (Hover your mouse over the icons for additional explanation.)

Macintosh DVD Video/Audio.
This method is useful if you have DVD files already authored and in the correct format on your Hard Drive. It is also useful to copy DVDs that failed to copy using the CD/DVD Copy method. This method assumes you have used your DVD authoring software to create Audio_TS and Video_TS folders with the proper files formatted in each -or- that you have copied these folders from an existing master DVD on to your Hard Drive. A Video_TS folder must be at the root of any DVD. Inside the Video_TS folder are specific DVD files, shown below, that are created by your authoring software.
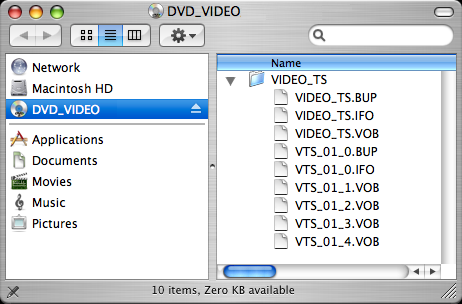
1. Once you have your Audio_TS (optional) and Video_TS folders created, you can start Discribe. Click on any of the 3 job selections and it will bring you to the main Discribe screen.
2. Click on the up/down arrows to the right of the job name you selected and it will display the list of all available jobs. Choose DVD Video/Audio.
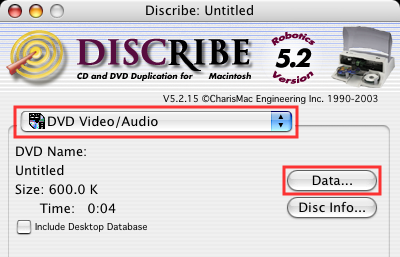
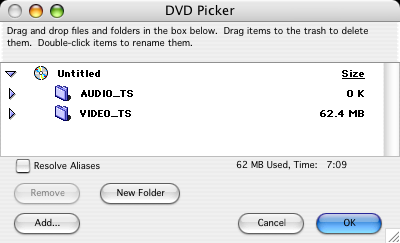
3. Click on the data button to bring up the DVD Picker window. Drag and drop your Audio_TS and Video_TS folders into this Picker window. Click OK.
4. Click on the Robot Write (Burn) button.
5. If you want to print a label on the disk, check the Print Image on Discs option. Click on Choose Image and browse for the label you have created in Discus or Photoshop. After your image has been selected, click on Page Setup and change the “Format For” option to Disc Publisher and change the “Paper Size” option to CD/DVD. Click OK.
6. Select the number of copies you want. When doing DVDs it is best to keep your “Stop Job if more than” option set to 4 or less.
7. Set the write speed and select the Write option.
8. Leave Ignore Read Errors unchecked and make sure Using Burn-Proof/JustLink is always checked. Burn-Proof will prevent other programs from accessing the burner drive while Discribe is burning to it.
9. Click on Start and a message will come up asking you if you want to copy the files and finalize the Disk. Click Yes. The Bravo will start duplicating your DVDs.

Primo DVD Data Job
This method assumes you have used your DVD authoring software to create Audio_TS and Video_TS folders with the proper files formatted in each -or- that you have copied these folders from an existing master DVD onto your Hard Drive.
If you have already created a master disc, start with step one. If you have DVD folders (Audio_TS and Video_TS) on your Hard Drive start with step two.
1. Using Windows Explorer, copy the Audio_TS (optional) and Video_TS folders from the master DVD to your hard drive. Or, use your DVD publishing software to create an output format in Audio_TS and Video_TS folders. A Video_TS folder must be at the root of any DVD. Inside the Video_TS folder are specific DVD files, shown below, that are created by your authoring software.
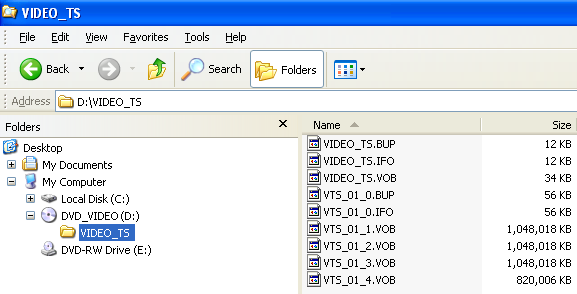
2. Select File - New Job - Data Disc. A Data Disc job setup panel will be created in the job setup panel.
3. Right click in the data window and choose Add File / Folder. Select the Audio and Video TS folders. Make sure that the Audio_TS and Video_TS folders are at the root of the DVD. Use the Modify Folders on Disc feature to change the folder structure if necessary. For more information and complete data job instructions see the Data Job article.
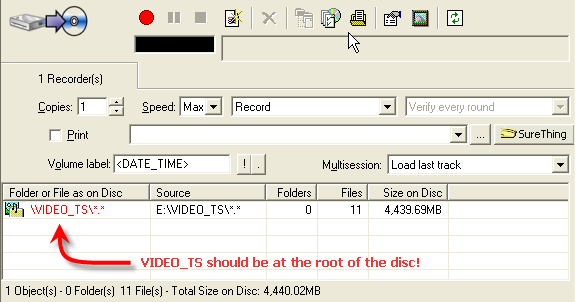
4. Primo will recognize the Audio_TS and Video_TS folders and automatically formats the job to create DVDs.

PTPublisher DVD Video Disc
This method assumes you have used your DVD authoring software to create Audio_TS and Video_TS folders with the proper files formatted in each -or- that you have copied these folders from an existing master DVD on to your Hard Drive.
If you have already created a master disc, start with step one. If you have DVD folders (Audio_TS and Video_TS) on your Hard Drive start with step two.
1. Using Windows Explorer, copy the Audio_TS (optional) and Video_TS folders from the master DVD to your hard drive. Or, use your DVD publishing software to create an output format in Audio_TS and Video_TS folders. A Video_TS folder must be at the root of any DVD. Inside the Video_TS folder are specific DVD files, shown below, that are created by your authoring software.

2. Open PTPublisher. Select DVD Project - DVD Video Disc. A DVD Video Project job setup window will be displayed.
3. Select the Audio and Video TS folders by clicking the Browse button. Selecting the Video_TS folder will automatically select the Audio_TS folder if it is present. Click the Next button.
4. Add a print file. Adding a print file is the same for any job type. Click the Next button.
5. Review the Job Summary window to make sure all of your settings are correct. Choose the number of copies. Click the green Go button.