Cartridge
A defective, empty or clogged cartridge will cause all of the problems listed above.
1. Try a new cartridge. Make sure that the ink cartridge has ink remaining. We often get cartridges returned as "bad" when in reality they've just run out of ink.
2. Manually Clean Cartridge. Follow this procedure:
1. Remove the print cartridges.
2. Moisten a lint-free cloth with water.
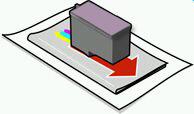
3. Hold the cloth against the nozzles for three seconds. This will "wick" some additional ink onto the damp cloth.

4. Wipe in the direction shown.
5. Repeat the process.
NOTE: Even brand new cartridges may need cleaning. Depending on where the cartridge was purchased from, it may have been sitting in the reseller's warehouse for several months before you received it. If you keep a lot of cartridges on hand, it may have been on your shelf for several months. If the cartridge is older than 90 days, even if it is sealed in its packaging, the nozzles can begin to dry out.
3. Clean the Maintenance Station. This article explains how to clean the maintenance station to prevent quality problems.
Printer Settings (How to find Printer settings? For PC...For Mac...)
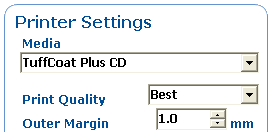
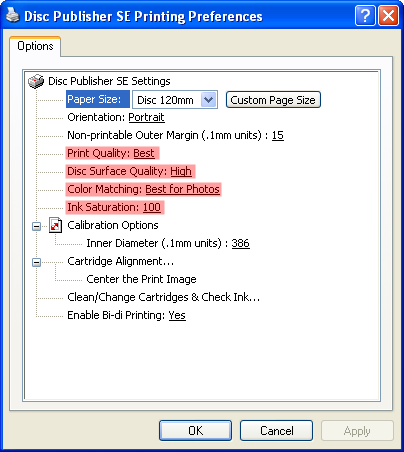
Adjusting the printer settings may solve banding problems and color matching issues. Two print settings affect print quality and color matching on a Bravo SE: Quality and Color Matching.
Below is an explanation of each of these individual settings.
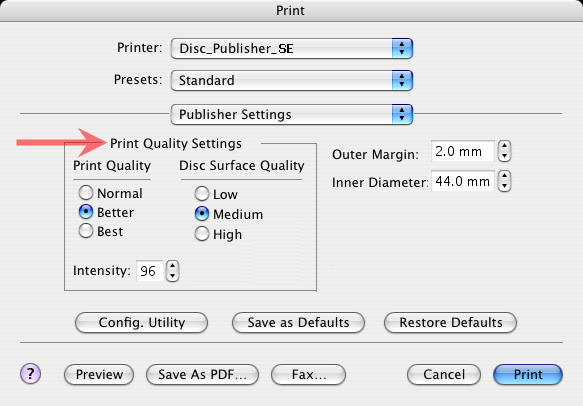
Print Quality. If you are using the PTPublisher software you can toggle between Low, Medium, Better, High and Best on the Add a Print file screen. The number of passes the ink carriage makes increases as you increase print quality. This results in a better print. You may also change Print Quality and Disc Surface Quality in the Printer Preferences.

Color Matching.
Graphic mode is best used for graphical images where accurate color reproduction is not as essential. Images printed in this mode will look more vibrant because more ink is being used to produce them. However, printing images of people may produce skin tones that have a reddish tint.
Photo mode is best used for photographic images where accurate color reproduction is very essential. Images printed in this mode will look lighter than those printed in Photo mode. Skin tones especially will look more natural in this mode. This is the default setting
NOTE: Exact color matching of the printed discs to the screen may never be possible since there are factors that affect this out of the drivers control. The surface of the disc reacts with the ink in the cartridge to produce the color. For this reason, when printing the same image to different brands of discs with different printable surfaces the printed output can look entirely different.
Source Image Formatting.
If you have designed a label in another program, such as Adobe Photoshop or Illustrator, Print Quality or Color Matching problems may be the result of improper image format. This could also be true if you have imported a graphic or a background created in another program into the SureThing program.
File Type. If you are printing an image file directly or importing an image or a background into SureThing, certain image formats work better than others. Try JPG, TIF, BMP. All of these format choices are available from the "Save as" or "Export" screens of popular graphics programs.
Image Mode. Try changing the image mode of the source file. (CMYK or RGB)
Resolution. Make sure the DPI of the source image is at least 300 DPI. Remember you can never successfully add resolution to a photograph. Your graphics program may allow you to do it but print quality will not improve. See this article on resolution for more information.
Graphic Design Tips. See this article on Graphic design tips for beginners and professionals.
Note: If you use a SureThing background and have designed the label entirely within SureThing you can be assured the resolution, image mode and file type are correct.
Other factors that affect print quality and color matching.
Ink Saturation. In any mode or quality setting you can cause the image to look lighter by decreasing the saturation.
Media type/Disc Surface. Try new discs. There is a wide variety of printable-surface discs on the market. Some print great, some do not. The Tuff-Coat brand discs that we sell at www.primerastore.com are very good discs for printing and burning.
How do I find printer settings?
PC: Go to Start - Control Panel - Printers and Faxes - Right click on the specific printer - Choose Printing Preferences.

MAC: Go to Publisher Settings in the Copies and Pages drop down on the screen before you print -or- click Print Settings in Discribe.

Related articles: Click here if you are having quality problems printing from a Bravo, Bravo II or Signature.