How do I reset to factory defaults on the CX1200 printer?
WARNING! Do not reset factory defaults unless directed to do so by Primera Tech Support.
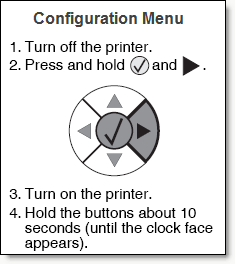
1. To reset factory defaults you must first access the hidden Configuration Menu. Follow these steps to access this menu:

Once you are in this menu select Factory Defaults - Select Restore Base. The printer menu will show a message that it is resetting and the main printer fan will turn on at the highest speed. Once the printer has returned to the Config Menu, switch off the printer and turn it back on to exit this menu and return to the main menu.
2. Now set the following settings in the Paper Menu on the printer's front control panel:
a. Default Source = MPFeeder (Press the Menu Button - Select Paper Menu - Select Default Source - Select MPFeeder)
b. MPFeeder size = Universal (Press the Menu Button - Select Paper Menu - Select Paper Size/Type - Select MPFeeder Size Type - Select Universal)
c. MPFeeder Type = Labels (Press the Menu Button - Select Paper Menu - Select Paper Size/Type - Select MPFeeder Size Type - Select Universal - Select Labels)
3. Turn off the cartridge alarm on the settings menu. (Press the Menu Button - Select Settings - Select Setup Menu - Select Alarms - Set Cartridge Alarm to off.)
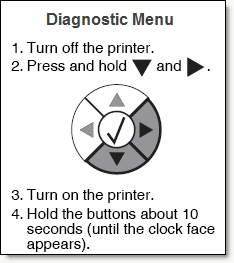
4. Turn on Edge to Edge printing in the Diagnostics Menu. You will need to access this hidden menu using the steps below:

Once you are in the Diagnostic Menu select Printer Setup - Select Edge to Edge - Select *On. The menu will display "submitting..." Once the menu screen returns, turn off the printer and turn it back on again to exit this menu and return to the main menu.
Note: When navigating all menus use the up and down arrow buttons to scroll through menu items. Some menus have more items than can be displayed on a single screen. Continue pressing the down arrow until all menu items are seen. A scroll bar on the right side of the menu screen will show your position on the menu. To select any item, press the check button.