I would like to print a serial number, print date/time, or personalized information on discs - Each disc that is printed will have different information - How do I use SureThing merge fields?
With the Insert Field function of the SureThing CD Labeler software you can create serialized discs, automatically print the print date or time on the disc or personalize a disc by printing specific information from a record in a data file. The result is automated printing of multiple discs where each disc has unique text.
All of this can be accomplished by using the Insert Field item on the Insert Menu. Below is a description of the most common field uses.
Print Date. Choose Insert Field - click the Special Field Tab - Print Date. This inserts the date the design was last printed. This field is updated each time you print your design. Choose from a number of date formats or click Settings to enter your own custom format in the Date/Time Format dialog box.
Print Time. Choose Insert Field - click the Special Field Tab - Print Time. ThisiInserts the time the design was last printed. This field is updated each time you print your design. Choose from a number of time formats or click Settings to enter your own custom format in the Date/Time Format dialog box.
Serial Number. Choose Insert Field - click the Special Field Tab - Serial Number. This inserts a serial number, which is incremented each time it is printed. Click Settings to change the operating characteristics of the number in the Serial Number dialog box.
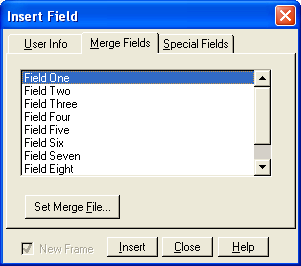
Printing Records From a Data File. Choose Insert Field - click the Merge Field Tab. Select Field 1-10. Set the Merge Data file for each individual field by clicking the Set Merge File button for each. A windows open dialog will display. Select the location of the merge file. Click insert to insert the chosen field. The field will display in your image as a text box with {Field One} as text. Change the font or the color by highlighting the text just as you normally would.

The following data file formats are accepted.
- Windows/ANSI Comma delimited
- DOS/PC-8 Comma delimited
- Windows/ANSI dBASE
- DOS/PC-8 dBASE
- MicroVision Database
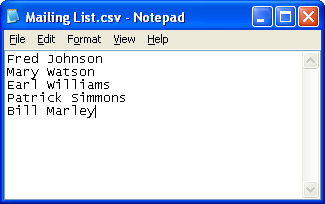
Basically this means that you can use a text file with a .csv extension containing a list of names or other data that you want printed on a disc. Each record is separated by a carriage return. See the example below:

Once this location has been set, you cannot move the data file without resetting the Merge File in SureThing. If the Merge File is not found in the location hard coded in the file, SureThing will automatically look in the same file that the design is located.
Note: To create a new text box, before you insert a field make sure you are in object mode. (Cursor should not already be in a text box) To insert a field into an existing text box the cursor should already be in this text box.