Laser Tube Replacement in the Epilog Mini and Helix
Machine Types: Epilog Mini 18/24 and Helix
Tools needed: Phillips head screwdriver #1
- Turn off and unplug the laser system.
- Facing the back of the machine, remove the 9 screws using the Phillips head screwdriver on the back panel.
- The laser tube is silver in color and sits directly above the exhaust outlet. Disconnect the gray communication cable from the left side of the laser tube by pressing the plastic tab on it and pulling it free from the laser tube itself.
- Next, disconnect the black and red wire connection located on the left side of the laser tube by unplugging it from the wiring harness. To do this, simply press down on the plastic tab of the connector and pull free from the plug of the wiring harness.

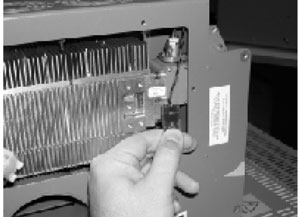
- You will now need to unplug the Red Dot pointer. This is located on the right side of the laser tube. There is a small red and black wire that comes from the diode and connects to a black connector. Disconnect this connector by pressing on the plastic tab and pulling the connector free.

4
- Now locate the Phillips head screw with the green ring around it located just up and to the left of where you disconnected the 2 connections mentioned in steps 3 and 4. Using the Phillips head screwdriver, loosen this screw until it stops. The screw will not drop out and is held to the bracket with the green ring.
- Now locate the Phillips head screw with the green ring on the right side of the laser tube. There is one on the top and one on the bottom. Loosen both of these until the screw stops.

- The laser tube can now slide on the pin located above the green ringed Phillips head screw on the left of the tube and the pin located to the left of the green ringed Phillips head screw on the upper right side of the laser tube. This one will be hard to see as it located behind the cooling fins of the laser tube. The laser tube now needs to slide to the left until it stops.
- The laser can now be pulled free from the back of the machine.
- You will need to remove the red and black wire power harness from the left side of the laser tube and install it on the new laser tube. To do this, simply remove the 2 screws using the Phillips head screwdriver that secure the power harness to the 2 terminals located on the left side of the laser tube. Make sure the orientation of the black and red wires are the same when installing back onto the new laser tube.
- To install the new laser tube, simply reverse steps 10 back down to 1.
If you have any further questions regarding this procedure, please contact Epilog Technical support at the following:
Phone 303-215-9171
Fax 303-531-7594
Email [email protected]