Wireless Printing to an Epilog Laser
Did you know that current Epilog laser systems (Zing, Mini, Helix, EXT and FiberMark) have the ability to be set up as a wireless printer?
This means you can print to your laser wirelessly from any computer that has wireless capability and is within range. It's surprisingly easy to do - read on for instructions!
This article walks you through a basic approach to wireless printing, and assumes the computer you're using will only be used to print to your laser.
Additionally, this article assumes a certain level of expertise in installing wireless communications and is not intended as a primary means of communication for most users. More complex wireless setups will likely require the skills of your IT professional, but for the tech-savvy, this can be a very convenient way to communicate with your laser.
Here's what you'll need:
- A computer with wireless capability.
Almost all laptops sold over the last two or three years have wireless capability built-in. If you have any version of a wireless 801.11, you have wireless capability built in to your laptop. Most desktop computers do not have wireless built-in.
- A wireless router or a wireless access point. These can be purchased anywhere you can purchase home networking equipment.
- A Cat 5 Ethernet cable (usually comes with the router or access point).
- An Epilog laser system!
Note: We’re going to show how the wireless router or access point can be use to receive print jobs at your laser. Since the wireless router and access point are 100% interchangeable for this application,
whenever we say router, assume we are referring to both the router and access point.
The illustration below shows the configuration of all the components: the computer, router, Cat 5 cable and laser system.

Install Print Driver
1) Install another print driver for your laser and activate a new TCP/IP port on your computer. To do this, go through the Add Print Driver process. Adding another print driver allows us to set up a new TCP/IP address that will be used exclusively for the wireless router. Use the same print driver version you are currently using (available at www.epiloglaser.com/downloads.htm). If needed, refer to your manual for instructions on installing the print driver on an Ethernet connection. These instructions walk you through the necessary steps to install and activate your new TCP/IP port
2) When installing the new driver, you’ll be asked to set a new TCP/IP address. We’ll use 192.168.1.5 (do not use the same sequence of numbers that are listed in your manual. It’s very important that you use a 1 in the third group of numbers for the router (192.168.1.5).
Laser and Router Setup
1) Set the IP address in your laser system to 192.168.1.5. This number must match the number you used in the step above. Refer to your manual for instructions on setting the IP address in the laser.
2) Use a standard Cat 5 Ethernet cable (it usually comes with the router) to connect the wireless router to the Ethernet port on your laser system. Connect the power to the router.
Configure Computer
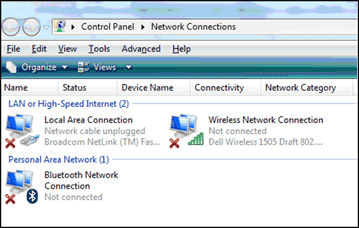
Go to Start | Control Panel | Network and Sharing Center. Go to Manage network connections. Right click on your Wireless Network Connection and then select Properties.

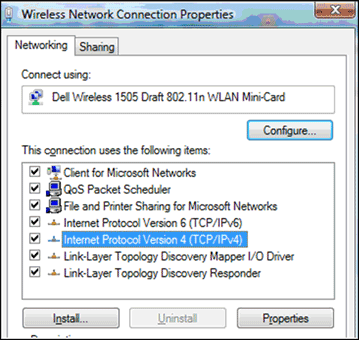
In the Wireless Network Connection Properties window, select Internet Protocol Version 4 (TCP/IPv4). Then select Properties.

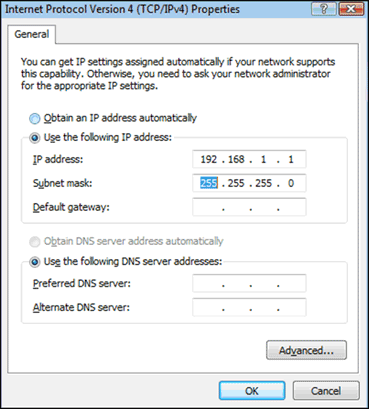
In the Properties window select Use the following IP Address: Set the address to 192.168.1.1 and the subnet Mask to 255.255.255.0 (shown to the right).
After setting the IP Address and Subnet Mask, click OK to exit all windows.

Helpful Tips to Keep in Mind
Most home networking routers have a default IP address assigned in the format of 192.168.1.xxx. If this is not true of your router, you will need to modify the TCP/IP port that you activated to fit the format of the router you are using.
Be careful when using zeros in the IP addresses: 192.168.001.005. Windows Vista interprets the zeros as part of the format, but Windows XP doesn’t. Since you input the IP address in two different places in the computer, be careful that they are identical. It’s best to use the format of 192.168.1.5 (without the zeros), but just be consistent. In the laser itself you have to use the zeros, but it adjusts automatically and will work properly as long as your computer is set up correctly.